The thing about this is that it’s so versatile, you could add some lashes and dark lipstick for a more dramatic effect, or stick to the mascara and a natural lip for a more toned down feel.
To begin with, I’m going to start in the order that I do this in, which is very random.. After I’ve moisturised my face and got it all set and ready, Urban Decay’s Pore Perfecting primer is the base of choice, it’s not great but not bad either, still not sure how I feel, it is lightweight, which is nice.
Next is correctors, I like them to sit on my face till I’m done with eyes, allowing for seamless blending. The correctors I use are from a palette I got at Flormar, which is now available in Dubai. I use the peach & the pink under my eyes and the green for red spots. This helps them from showing through my concealer.
The concealer I’ll use over that would be my MAC Pro longwear and I would add some Maybelline Dream Lumi under my eyes and as a base highlight. I say base because well.. if you know me around here, which I’m hoping you do, I am always dewy. No matter what. Yes, I’m an oily skin girl, but I will always do the dew. This is my last step because I don’t really fancy the fallout *if any* from my shadows running underneath the eyes and making it look grey after failed attempts to clean it.
Who doesn’t love the Urban Decay Primer Potion?! The majority of the people I know use this and love it! Having oily eyelids & not using a primer just doesn’t work.. it’s impossible if you want non-creasing eye makeup that’ll last.
My Lorac Pro 1 has slowly taken place of my other palettes, mainly because it has the perfect balance of mattes and shimmers, great pigmentation and buttery shadows.. It really is a beautiful palette if you’re looking to buy just one. I’ll start off with a creamy shade called “Cream”, how surprising, all over my lid and to highlight my brow bone then, I take “Taupe” and use that as a crease colour, “Espresso" in the outer “V” and on the lower lash line. I just take the “Black” and line my upper lash line,followed by a tight line using Urban Decay 24/7 Glide on pencil liner in “Empire”.To finish off, I either add more “Cream” on the lid or “Champagne+ Nude”, & on the inner corner.
I love using purples on my eyes,hence the purple liner,I find them very flattering on brown eyes, green eyes, and even blue!
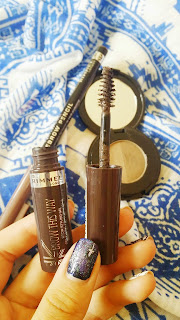
Maybelline The Falsies is my favourite mascara, I’ve gone through a few of these and have a hard time finding a replacement for it. One or two coats of that and now I’m back to the eyes. For brows I’ve been loving the Rimmel "Brow This Way" tinted brow gel, on it’s own or above the Rimmel eyebrow pencil in “Hazel 002”. For even more definition, I use my beloved trio, however, each could be used independently. The last of the brow trio is my Anastasia Brow Powder duo in “Medium Brown”.
To face the base, I use the Laura Mercier Tinted moisturiser, this is slightly dark on my skin since it oxidises so I’d suggest a lighter colour. I really like this and I’ve had it for a really long time. Build-able light to medium coverage. Mixed in with some NYX Illuminating liquid in “Gleam” because, I love the glow it gives to my skin. Not glitter but glow.
The Hourglass Ambient Lighting palette is amazing, it makes my makeup look good, always. Great if you’re in a hurry, you’ll trick people into thinking it took you hours to do your makeup. Everyone always compliments my skin and I know it’s just these powders! Dim light is my favourite setting powder, then I use Incandescent Light and Radiant Light as an all over highlight. For contour/bronze I use the Sleek Contour kit, the highlight in this is also amazing. Then I follow up with the Elf Bronze/Blush duo in “St Lucia”, as a dupe for the Nars one. The bronzer has a bit of shimmer in it so it amplifies the matte contour, and the blush is a peachy colour that is very flattering on most skin tones.
This is quite an in-depth tutorial and I hope I haven’t taken too long here. The next part after this is just explaining the versatility of this look. For lips I’ve been loving Mac’s “Mehr”, a matte dusty rose shade with hints of plum, toned down.
However, as I said before, this look could be used on it’s own, as it is, or amplified. You could use some more shadows to deepen it and a nude/pale pink lip, with some lashes. I liked to add some of the “Deep Purple” from the same palette in the outer “V”,and intensify it with that, or use “Sable” as the only darkening shadow and pair it with a red/deeper lip, might throw in some lashes. My favourites are by Red Cherry in either #DW or #415. This look works as a staple or a base to go further from, which is why I love it so much.
Thank you so much for reading, I hope you learned something new today! Much love xx
Ps: Don’t forget to blend!


No comments:
Post a Comment